
Whether your manicure has chipped beyond saving or you’re simply ready for a fresh colour, removing nail varnish is something most of us do without a second thought. But are you doing it the right way? The method you use, the products you choose, and how you care for your nails afterwards can make a significant difference to the long-term health and strength of your natural nails.
In this complete guide, we’ll walk you through every method for removing nail varnish — from classic acetone-based removers and gentler non-acetone formulas, to surprisingly effective household hacks for when you’ve run out of remover entirely. We’ll also cover what nail varnish remover is actually made of, which method suits which nail type, common mistakes to avoid, and the aftercare your nails need once the polish is gone.
What Is Nail Varnish Remover Made Of?
Before diving into the how, it helps to understand the what. Most nail varnish removers work by using chemical solvents that break down the polymer film of nail polish, dissolving the pigment so it can be wiped away easily.
There are two main categories:
Acetone-Based Removers
Acetone is the most common active ingredient in traditional nail varnish removers. It is a powerful, fast-acting solvent that quickly dissolves regular nail polish, glitter formulas, and gel polish. Acetone-based removers work rapidly — often within seconds on regular polish — making them the most efficient option available.
The downside is that acetone doesn’t discriminate. It dissolves your nail polish, but it also strips your nail’s natural oils and the protective hydrolipidic film that keeps nails flexible and hydrated. Dermatologist Dr. Dana Stern notes that harsh solvents like acetone are a major source of nail damage, causing dryness, brittleness, peeling, and cuticle irritation with repeated use. That chalky white residue you sometimes see on nails after using acetone? That is visible dehydration of the nail plate.
Non-Acetone Removers
Non-acetone nail varnish removers use alternative solvents, most commonly ethyl acetate — a colourless, fragrant compound that is gentler on the nail plate and surrounding skin. These removers take longer to work than acetone, especially on dark shades, glitter, or long-wear formulas, but they are considerably kinder to your nails and cuticles.
Non-acetone removers are particularly recommended for people who change their nail colour frequently, have brittle or dry nails, or wear nail extensions, as acetone can weaken acrylic and gel extensions.
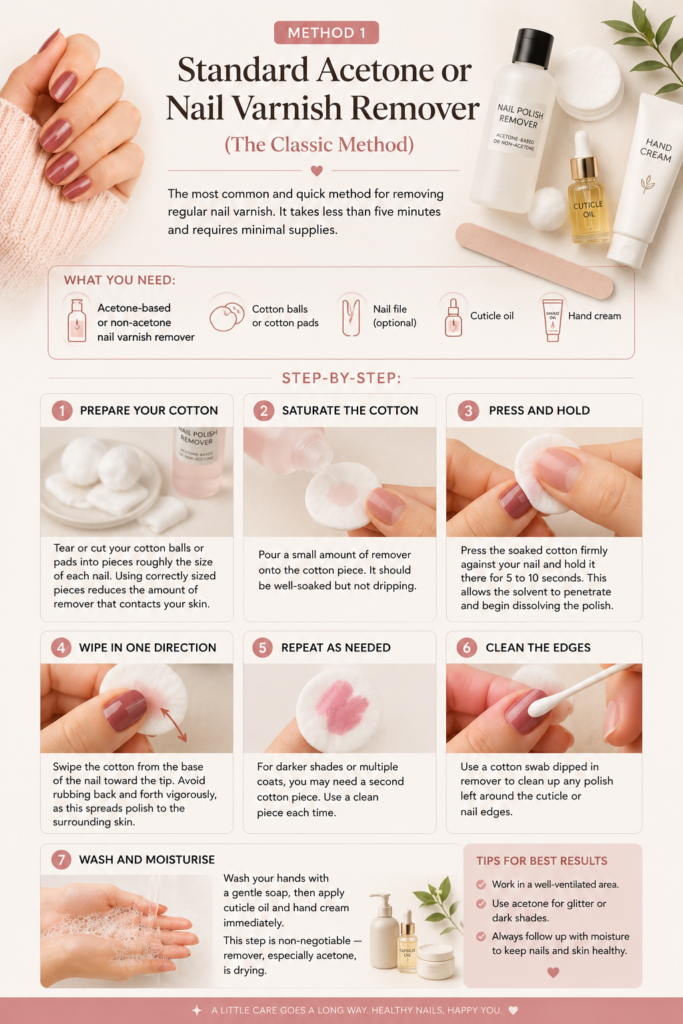
Method 1: Standard Acetone or Nail Varnish Remover (The Classic Method)
This is the most common and quickforward method for removing regular nail varnish. It takes less than five minutes and requires minimal supplies.
What you need:
- Acetone-based or non-acetone nail varnish remover
- Cotton balls or cotton pads
- A nail file (optional, for cleanup)
- Cuticle oil and hand cream
Step-by-step:
- Prepare your cotton. Tear or cut your cotton balls or pads into pieces roughly the size of each nail. Using correctly sized pieces reduces the amount of remover that contacts your skin.
- Saturate the cotton. Pour a small amount of remover onto the cotton piece. It should be well-soaked but not dripping.
- Press and hold. Press the soaked cotton firmly against your nail and hold it there for 5 to 10 seconds. This allows the solvent to penetrate and begin dissolving the polish rather than simply skimming the surface.
- Wipe in one direction. Swipe the cotton from the base of the nail toward the tip. Avoid rubbing back and forth vigorously, as this spreads polish to the surrounding skin rather than removing it cleanly.
- Repeat as needed. For darker shades or multiple coats, you may need a second cotton piece. Use a clean piece each time.
- Clean the edges. Use a cotton swab dipped in remover to clean up any polish left around the cuticle or nail edges.
- Wash and moisturise. Wash your hands with a gentle soap, then apply cuticle oil and hand cream immediately. This step is non-negotiable — remover, especially acetone, is drying.
Method 2: The Foil Wrap Method (For Stubborn or Glitter Polish)
Glitter nail varnish is notoriously difficult to remove with a simple wipe, because the glitter particles sit within layers of polish and don’t dissolve as quickly as regular pigment. The foil wrap method keeps the remover in sustained contact with the nail, dramatically improving its effectiveness on stubborn formulas.
What you need:
- Acetone nail varnish remover (or pure acetone for very stubborn glitter)
- Cotton balls
- Aluminium foil, cut into squares large enough to wrap each finger
- A cuticle pusher (optional)
- Cuticle oil
Step-by-step:
- Saturate a cotton ball piece in acetone remover.
- Press it onto the nail, ensuring full coverage.
- Wrap the finger tightly in a square of foil to hold the cotton in place and create a sealed environment that prevents the solvent from evaporating.
- Wait 5 to 10 minutes.
- Remove the foil and cotton together with a twisting motion — this wipes away most of the polish in the process.
- Use a cuticle pusher to gently remove any remaining glitter or polish residue.
- Moisturise thoroughly with cuticle oil and hand cream.
This method is also widely used by salons and works exceptionally well on long-wear formulas and dark shades that resist a standard wipe.
Method 3: Non-Acetone Remover (For Gentle, Regular Polish Removal)
If you paint your nails frequently or have naturally dry, brittle nails, switching to a non-acetone remover is one of the best things you can do for your nail health. The active ingredient — typically ethyl acetate — works through the same solvent mechanism as acetone, just more slowly and without stripping your nail’s natural moisture barrier.
How to use it:
- Soak a cotton pad generously with non-acetone remover.
- Press it against the nail and hold for a slightly longer time than you would with acetone — around 15 to 20 seconds — to give the gentler formula time to penetrate.
- Wipe from base to tip.
- Repeat if needed; non-acetone removers often require a second pass on darker colours.
- Apply cuticle oil to finish.
Who should use non-acetone remover:
- People who remove nail varnish frequently (weekly or more)
- Those with dry, brittle, or damaged nails
- Anyone wearing nail extensions or overlays (acetone weakens acrylic and gel)
- Those with sensitive skin or allergies to acetone
The trade-off is time and effectiveness — non-acetone removers are not ideal for glitter polish, dark long-wear formulas, or gel varnish, where acetone’s stronger dissolving power is genuinely needed.
Method 4: Hand Sanitiser
This is one of the most useful emergency hacks when you’ve run out of remover. Most hand sanitisers contain around 60% alcohol, and since alcohol is a solvent, it can break down regular nail polish effectively enough to remove it in a pinch.
How to use it:
- Apply a generous amount of hand sanitiser to a cotton ball or pad.
- Hold it against the nail for about 10 seconds.
- Rub away the polish — it should lift relatively easily on lighter shades.
- Repeat on each nail.
- Wash hands and moisturise, as alcohol is drying.
This method works best on lighter shades of regular polish. Dark or long-wear formulas may require several applications and more effort. It won’t work effectively on gel or glitter varnish.
Method 5: Rubbing Alcohol (Isopropyl Alcohol)
Rubbing alcohol works on the same principle as hand sanitiser — it’s a solvent that can dissolve the polymer in regular nail polish. It’s more concentrated than most hand sanitisers, making it slightly more effective.
How to use it:
- Soak a cotton ball in rubbing alcohol.
- Hold it firmly against the nail for 10 to 15 seconds.
- Rub away the polish with a firm, sweeping motion.
- Use a fresh cotton ball for each nail.
- Apply hand cream and cuticle oil afterwards, as rubbing alcohol is particularly drying to the skin.
Like hand sanitiser, rubbing alcohol is suitable for regular polish in lighter to medium shades. It is not effective on gel, shellac, or heavily pigmented glitter polishes.
Method 6: Warm Soapy Water Soak
For very light polish or as a way to loosen an existing manicure before wiping it away, soaking your nails in warm, soapy water can be a gentle first step. Adding a small amount of white vinegar to the soak increases its mild dissolving effect, as acetic acid (the active component in vinegar) helps to break down the polish.
How to use it:
- Fill a small bowl with warm (not hot) water.
- Add a few drops of mild dish soap and a teaspoon of white vinegar.
- Soak your fingertips for 10 to 15 minutes.
- The polish should be softened and loosened — gently rub each nail with a cotton pad or soft cloth to lift it away.
- Apply hand cream and cuticle oil.
This is a genuinely gentle method and won’t dry out your nails the way solvents can. However, it is slow, requires patience, and works best on light shades of regular polish that are already beginning to chip. It will not remove gel varnish, dark pigments, or long-wear formulas.
Method 7: Lemon Juice and White Vinegar
A popular natural alternative that harnesses the mild acid in both lemon juice and white vinegar to break down nail polish pigment. The citric acid in lemon juice and the acetic acid in vinegar work together to soften and lift the polish.
How to use it:
- Mix equal parts of fresh lemon juice and white vinegar in a small bowl.
- Soak your nails in the mixture for around 10 minutes.
- Use a cotton pad or soft cloth to gently rub away the softened polish.
- Rinse with clean water.
- Apply cuticle oil and hand cream — citric acid can be slightly drying.
This method is very gentle and works best on light shades of regular polish. It is not effective on dark, glitter, long-wear, or gel formulas and requires more time and effort than a commercial remover.
Method 8: Toothpaste
It sounds unusual, but toothpaste can help remove regular nail varnish thanks to two of its common ingredients: ethyl acetate (which is also found in nail polish removers) and baking soda, which acts as a mild abrasive.
How to use it:
- Apply a small amount of toothpaste — preferably one containing baking soda — directly onto the nail.
- Use an old toothbrush or your fingertip to scrub the nail in circular motions.
- Leave it on for 10 to 15 seconds before wiping away with a damp cloth.
- Repeat if needed.
- Rinse thoroughly and moisturise.
This is best used as a last resort when nothing else is available. It works reasonably well on light regular polish but won’t remove darker shades, glitter, or gel formulas in a single application.
Method 9: Fresh Nail Polish (The Polish-on-Polish Trick)
A surprising but genuinely useful trick: applying a fresh coat of nail polish over the old one can help remove it. The solvents in the fresh, wet polish re-dissolve the dried layer underneath, allowing you to wipe both off together before the new coat dries.
How to use it:
- Apply a fresh coat of regular nail polish over the existing colour.
- Immediately — within five seconds — wipe it away with a dry cotton pad.
- The old polish should come away with it.
- Repeat on each nail, doing one at a time quickly.
- Avoid quick-drying formulas, as they set too fast for this trick to work.
This method is best for light regular polish that has not had many layers applied. It does not work for gel, glitter, or long-wear formulas.
Acetone vs. Non-Acetone: Which Should You Choose?
Here’s a clear comparison to help you decide:
| Factor | Acetone | Non-Acetone |
|---|---|---|
| Speed | Very fast (seconds) | Slower (15–30 seconds per nail) |
| Effectiveness on regular polish | Excellent | Very good |
| Effectiveness on glitter polish | Excellent | Poor |
| Effectiveness on gel polish | Excellent | Not suitable |
| Effect on natural nails | Drying; strips natural oils | Gentle; minimal dehydration |
| Suitable for nail extensions? | No — weakens acrylic/gel | Yes |
| Best for | Glitter, gel, stubborn polish | Frequent users; sensitive/dry nails |
The bottom line, as put by beauty experts: if you want speed and power, acetone wins. If you’re prioritising nail health and moisture retention, non-acetone is the better choice for everyday regular polish removal.
Removing Nail Varnish From Skin and Cuticles
Getting nail polish on the skin around your nails during application is extremely common. Here’s how to clean it up without irritating your skin:
- During application (while wet): Use a cotton swab dipped in remover to clean the edges immediately. Non-acetone remover is gentle enough for skin cleanup.
- After it has dried: A small amount of remover on a pointed cotton swab works well. Alternatively, soaking your fingertips in warm soapy water for a few minutes will soften dried polish on skin, which can then be rubbed away gently.
- Natural option: A few drops of cuticle oil or olive oil massaged over dried polish on skin can help lift it without any harsh chemicals.
Common Nail Varnish Removal Mistakes to Avoid
Even something as seemingly simple as removing nail varnish can go wrong. Here are the most common errors and why they matter:
Rubbing aggressively back and forth. This spreads dissolved polish to the surrounding skin and cuticles rather than lifting it cleanly from the nail. Always wipe in one direction, from base to tip.
Using remover too frequently without moisturising. Regular exposure to solvents — especially acetone — strips the nail’s natural oil layer. Always follow every removal session with cuticle oil and hand cream.
Peeling or picking at chipping polish. This feels satisfying but removes the top layers of your nail plate along with the polish, leaving nails thin and ridged. Always dissolve the polish first.
Using acetone on nail extensions. Acetone dissolves the adhesive bond of acrylic and gel extensions, causing them to lift and separate. Always use a non-acetone remover for maintenance around extensions.
Not working in a ventilated space. Acetone fumes are strong and can cause headaches or dizziness in a poorly ventilated room. Always open a window or work near a fan when using acetone-based products.
Skipping aftercare. Nail varnish removal — particularly with acetone — is inherently drying. Skipping cuticle oil and hand cream after removal accelerates nail weakening over time.
Nail Aftercare: What to Do After Removing Nail Varnish
Proper aftercare keeps your nails strong, hydrated, and ready for your next manicure.
Apply cuticle oil immediately. This is the single most important aftercare step. Cuticle oil nourishes the nail matrix, restores lost moisture to the nail plate, and encourages healthy regrowth. Massage it into the nails and cuticles generously after every removal session.
Use a rich hand cream. Follow the cuticle oil with a nourishing hand cream to hydrate the skin around your nails, which suffers too during the removal process.
Give your nails a breather. If you remove and reapply nail varnish very frequently, consider taking a break every few weeks to let your nails recover fully. A brief polish-free period allows the nail plate to rehydrate and restores its natural resilience.
Use a nail strengthener if needed. If your nails feel thin, flexible, or prone to splitting after removal, a nail hardener or strengthening base coat can help rebuild their structure during the recovery period.
Stay hydrated. Nail health reflects overall hydration. Drinking enough water daily and eating a diet rich in biotin, protein, and healthy fats supports stronger, faster nail growth from within.
Final Thoughts: The Best Way to Remove Nail Varnish
There is no single universally “best” method — the right choice depends on your nail type, the formula you’re removing, and what you have available. Here’s a quick summary:
- Regular polish, in a hurry: Acetone-based remover with a cotton pad — fastest and most effective.
- Glitter or long-wear polish: Foil wrap method with acetone for maximum contact time.
- Dry or brittle nails, or frequent removal: Non-acetone remover — gentler and kinder to nail structure.
- No remover available: Hand sanitiser or rubbing alcohol for regular polish; warm soapy water with vinegar for very light shades.
- Natural option: Lemon juice and white vinegar soak — gentle but slow; best for light regular polish only.
Whatever method you choose, the golden rules are the same: be gentle, work in a ventilated space, never peel or pick, and always moisturise with cuticle oil and hand cream once the polish is off. Your nails will thank you for it.

