
Introduction: Why You Might Need an Alternative
Running out of nail polish remover is more common than you think—and the good news is that your kitchen, bathroom cabinet, or vanity already holds several effective substitutes. Whether you have sensitive skin that reacts poorly to acetone, live somewhere without a nearby pharmacy, or simply want a gentler, more natural approach, removing nail polish without nail polish remover is entirely possible.
This guide covers every proven method, explains the chemistry behind why each one works, ranks them by effectiveness, and helps you choose the right technique based on your nail type, polish type, and what you have on hand.
Understanding Why Nail Polish Bonds to Your Nail
Before diving into removal methods, it helps to understand what you’re dealing with. Nail polish is a polymer-based lacquer. When it dries, the solvents in the polish evaporate and leave behind a hardened film made primarily of nitrocellulose — a flexible, film-forming resin. This film bonds tightly to the keratin surface of your nail plate.
Traditional nail polish removers work by dissolving this nitrocellulose film using strong solvents — usually acetone, ethyl acetate, or isopropyl alcohol. The alternatives discussed below work on the same principle: they use milder versions of these solvents or other chemical interactions to soften and lift the polish film. None of them are as fast as pure acetone, but several come surprisingly close.
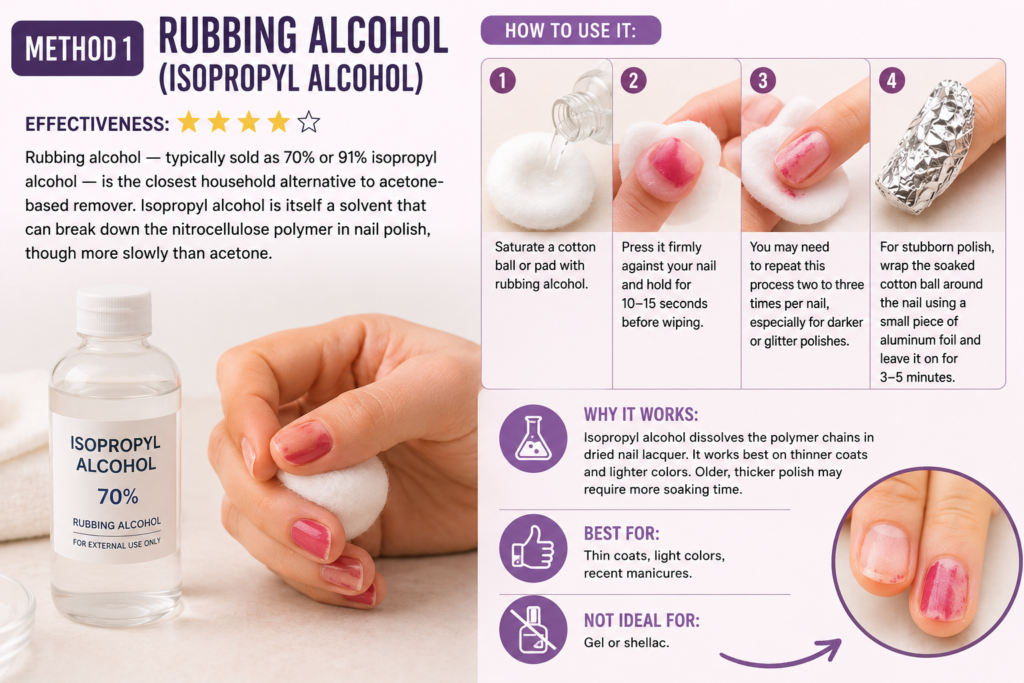
Method 1: Rubbing Alcohol (Isopropyl Alcohol)
Effectiveness: ★★★★☆
Rubbing alcohol — typically sold as 70% or 91% isopropyl alcohol — is the closest household alternative to acetone-based remover. Isopropyl alcohol is itself a solvent that can break down the nitrocellulose polymer in nail polish, though more slowly than acetone.
How to use it:
Saturate a cotton ball or pad with rubbing alcohol. Press it firmly against your nail and hold for 10–15 seconds before wiping. You may need to repeat this process two to three times per nail, especially for darker or glitter polishes. For stubborn polish, wrap the soaked cotton ball around the nail using a small piece of aluminum foil and leave it on for 3–5 minutes.
Why it works: Isopropyl alcohol dissolves the polymer chains in dried nail lacquer. It works best on thinner coats and lighter colors. Older, thicker polish may require more soaking time.
Best for: Thin coats, light colors, recent manicures. Not ideal for gel or shellac.
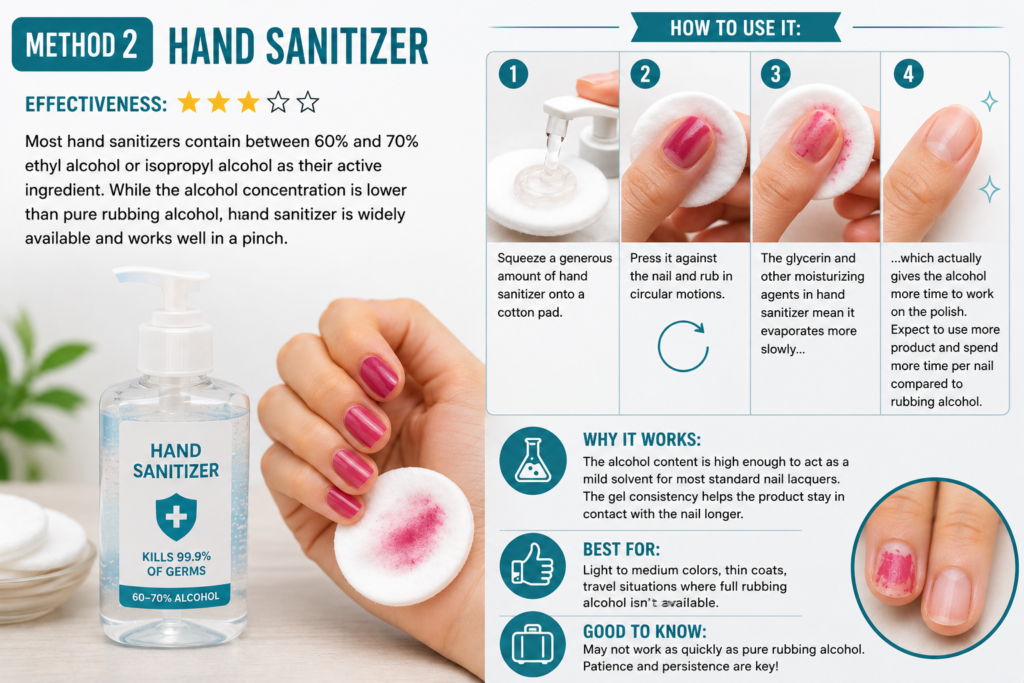
Method 2: Hand Sanitizer
Effectiveness: ★★★☆☆
Most hand sanitizers contain between 60% and 70% ethyl alcohol or isopropyl alcohol as their active ingredient. While the alcohol concentration is lower than pure rubbing alcohol, hand sanitizer is widely available and works well in a pinch.
How to use it:
Squeeze a generous amount of hand sanitizer onto a cotton pad. Press it against the nail and rub in circular motions. The glycerin and other moisturizing agents in hand sanitizer mean it evaporates more slowly, which actually gives the alcohol more time to work on the polish. Expect to use more product and spend more time per nail compared to rubbing alcohol.
Why it works: The alcohol content is high enough to act as a mild solvent for most standard nail lacquers. The gel consistency helps the product stay in contact with the nail longer.
Best for: Light to medium colors, thin coats, travel situations where full rubbing alcohol isn’t available.
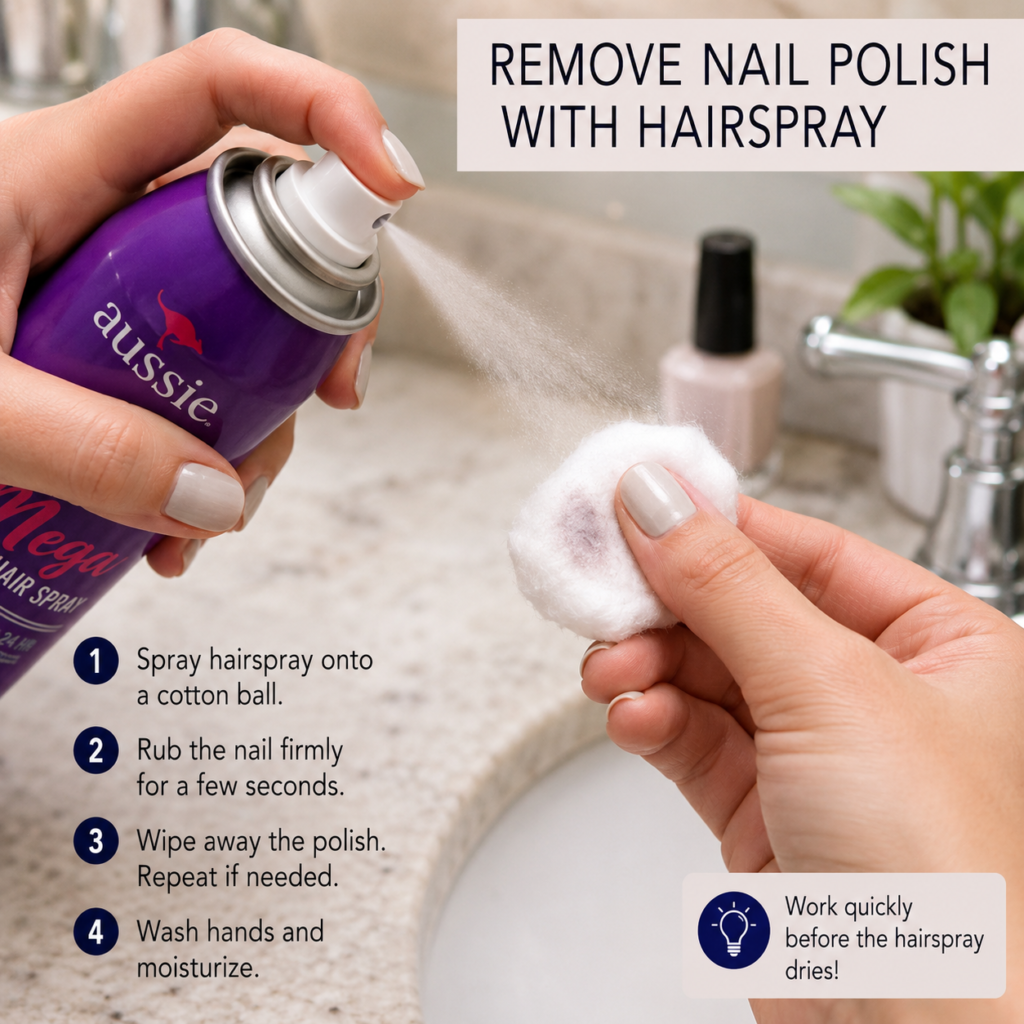
Method 3: Hairspray
Effectiveness: ★★★☆☆
This method often surprises people. Traditional aerosol hairsprays contain alcohol — often denatured alcohol or ethanol — as a carrier solvent, which is what gives them the ability to lift nail polish.
How to use it:
Spray a small amount of hairspray directly onto the nail or onto a cotton ball. Immediately rub the nail firmly while the hairspray is still wet and liquid. The key is speed — hairspray dries fast, and once it dries, the solvent action stops. Work one nail at a time and use a fresh cotton surface for each nail.
Why it works: The alcohol in hairspray acts as the same type of solvent as rubbing alcohol, just in a much lower concentration and diluted with water and other styling agents.
Best for: Light polish, single coats. Least effective of the alcohol-based methods. Works best as a last resort.
Method 4: Non-Acetone Nail Polish (The “New Polish” Trick)
Effectiveness: ★★★★★
This is one of the most effective non-remover methods and works on a surprising chemical principle. Fresh, wet nail polish contains solvents — the same type of solvents that make nail polish removers work. Before those solvents evaporate, they can re-dissolve old polish underneath.
How to use it:
Apply a fresh coat of any nail polish color (clear works fine) directly over your existing manicure. Immediately — before the new coat has any chance to dry — wipe it off with a cotton ball or dry cloth in a single smooth stroke. The fresh polish will lift the old polish off with it.
Why it works: Fresh nail polish contains ethyl acetate and butyl acetate as solvent carriers. These solvents soften and partially dissolve the existing cured polish, allowing both layers to be wiped away before the new coat cures.
Tips: Work quickly and decisively — you have about 10 seconds per nail. Use a flat-edged cotton pad rather than a rounded ball for better surface contact. This method works surprisingly well even on glitter polishes, where other methods struggle.
Best for: All polish types including glitter. Especially effective on recent manicures. Not recommended for gel or powder dip nails.
Method 5: Toothpaste
Effectiveness: ★★☆☆☆
Toothpaste — specifically white, non-gel varieties — contains mild abrasives (usually silica, calcium carbonate, or baking soda) that can physically scrub away the top layers of polish. Some toothpastes also contain small amounts of ethanol.
How to use it:
Apply a pea-sized amount of white toothpaste directly to the nail. Use an old toothbrush or your fingertip to scrub in firm circular motions for 30–60 seconds. Rinse and repeat as needed. Mixing toothpaste with a small amount of baking soda increases the abrasive effect.
Why it works: This is primarily a mechanical rather than chemical removal method. The abrasives in toothpaste physically erode the polish film rather than dissolving it. This makes it slow and somewhat tedious, but also extremely gentle on the nail.
Best for: Light, thin coats of regular nail polish. Good for sensitive nails that can’t tolerate solvents. Expect 3–5 minutes of scrubbing per nail.
Method 6: Hydrogen Peroxide and Hot Water
Effectiveness: ★★★☆☆
This is a gentler method that works through a combination of chemical softening and heat. Hydrogen peroxide (3%, available at pharmacies) can slightly break down the nail polish film, especially when combined with warm water to soften and expand the polish.
How to use it:
Mix two parts hot water with one part hydrogen peroxide in a bowl. The water should be as hot as is comfortable to soak your hands in — not scalding, but warm enough to expand and soften the polish. Soak your nails for 10–15 minutes. After soaking, use a soft nail brush, orange stick, or even your thumb to gently scrape and buff the polish away. It should come off in soft, pliable flakes.
Why it works: Heat causes the polish film to expand and its adhesion to the nail plate to weaken. Hydrogen peroxide has mild oxidizing properties that help break down the polymer structure of the polish.
Best for: Thin to medium coats. Particularly good for people with dry or cracked cuticles, as the warm soak is also deeply moisturizing.
Method 7: Acetone-Containing Products (Nail Glue Remover, Acetone-Based Cleaners)
Effectiveness: ★★★★★
If you don’t have nail polish remover but you do have nail glue remover, you’re in luck — nail glue removers almost always contain acetone. Similarly, some acrylic or fiberglass cleaning products, paint thinners, or adhesive removers contain acetone-adjacent solvents. Always check the label.
How to use it:
Apply the same way you would use nail polish remover: saturate a cotton ball and press firmly on the nail for 5–10 seconds, then wipe.
Safety note: Many industrial solvents are not safe for skin contact. Only use products clearly labeled as containing acetone alone, or acetone-based products marketed for personal care use. Never use paint thinner, turpentine, or gasoline on your skin.
Method 8: Lemon Juice and White Vinegar
Effectiveness: ★★☆☆☆
Both lemon juice and white vinegar are mildly acidic, and both contain trace amounts of compounds that can very slightly interact with nail polish. This is the most “natural” method on the list, but it’s also the least effective.
How to use it:
Combine equal parts lemon juice and white vinegar in a small bowl. Soak a cotton ball and press it against the nail for 30–60 seconds. Use firm pressure and buff in circular motions. Repeat several times.
Why it works: The acetic acid in vinegar and the citric acid in lemon juice can very mildly etch and soften the surface of nail polish. The effect is minimal — think of it as loosening the grip of the polish rather than dissolving it.
Best for: Very thin, light-colored polish on healthy nails. This method is better combined with mechanical scrubbing (a soft nail file or buffer) than used alone. It will not work on gel, shellac, or thick glitter polish.
A Note on Gel and Shellac Nail Polish
All of the methods above refer to regular air-dry nail lacquer. Gel polish and shellac are fundamentally different products — they are cured under UV or LED light and form a cross-linked polymer that is much more resistant to solvents than standard polish.
For gel and shellac, acetone is genuinely necessary. The standard removal method involves soaking gel nails in pure acetone for 10–15 minutes (typically using foil wraps). No household ingredient replicates this effectively. If you have gel nails and no acetone, your best short-term option is to gently file off the top layer of gel using a medium-grit file, which breaks the sealed surface and allows moisture and air to slowly degrade the gel over several days. This process is slow and carries a risk of nail damage if done aggressively — professional removal is recommended.
How to Choose the Right Method for Your Situation
| Situation | Best Method |
|---|---|
| You have rubbing alcohol | Method 1 (rubbing alcohol) |
| You only have hand sanitizer | Method 2 (hand sanitizer) |
| Glitter or dark polish | Method 4 (new polish trick) |
| Sensitive skin / no solvents | Method 5 (toothpaste) or Method 6 (hydrogen peroxide + hot water) |
| Very light / recent polish | Any method |
| Gel or shellac | None of the above work well — visit a salon |
Nail Care After Removal: Restoring Moisture and Strength
Any nail polish removal process — even the gentler ones — strips some natural oils from your nail plate and surrounding skin. After removing polish by any method, follow these steps to restore nail health:
Cuticle oil: Apply cuticle oil immediately after removal. Jojoba oil, almond oil, and vitamin E oil are all excellent options and absorb quickly without leaving a greasy residue.
Hand moisturizer: Use a thick hand cream or lotion, paying special attention to the cuticles and the skin around each nail. Alcohol-based removal methods are particularly drying.
Buffing: If the nail surface feels rough or looks dull after removal, gently buff it with a four-sided nail buffer. Start with the smoothing side and finish with the shining side. This removes surface irregularities and restores the natural luster of the nail plate.
Nail strengthener: If you regularly use solvent-based removal methods, apply a nail strengthener or hardener once a week on bare nails. Look for formulas containing keratin, biotin, or calcium.
Rest period: Give your nails at least one or two days of “breathing time” between manicures. This allows the nail plate to rehydrate and recover its natural flexibility.
Frequently Asked Questions
Can I use acetone from the hardware store to remove nail polish? Pure acetone is available at hardware stores and is chemically identical to nail polish remover acetone. It is safe for skin contact in the same way standard remover is — use it with cotton pads just as you would with nail polish remover. Avoid prolonged skin contact and work in a ventilated area.
Does baking soda remove nail polish? Baking soda alone does not effectively dissolve nail polish. It can be used as an abrasive when mixed with liquid dish soap or toothpaste to physically scrub away thin coats, but it has no chemical solvent action on nail lacquer.
Why does fresh nail polish help remove old nail polish? Fresh nail polish contains active solvents — primarily ethyl acetate and butyl acetate — that haven’t yet evaporated. These solvents temporarily re-dissolve the cured film of the old polish, allowing you to wipe both layers off together before they dry.
Is it safe to use rubbing alcohol on your nails regularly? Yes, in moderation. Rubbing alcohol is significantly gentler than acetone and is generally safe for regular use. It is more drying than acetone-free nail polish removers (which contain conditioning agents), so follow up with cuticle oil and hand cream after every use.
Can hairspray damage my nails? Hairspray contains resins and polymers in addition to alcohol, and regular use may leave a sticky residue on the nails or surrounding skin. It’s a useful emergency method but not recommended as a regular practice.
Conclusion
You don’t need nail polish remover to get rid of a manicure. Rubbing alcohol, hand sanitizer, fresh nail polish, and even toothpaste can all do the job — the key is matching the method to the type of polish you’re removing and the tools you have available. The fresh polish trick stands out as the most surprising and effective non-solvent method, especially for glitter polishes that resist other approaches. For everyday convenience, keeping a bottle of rubbing alcohol in your bathroom cabinet gives you a reliable, fast-acting alternative to traditional remover that’s gentler on skin and just as effective on regular lacquer.
Whatever method you choose, always follow up with cuticle oil and hand moisturizer to replenish what any removal process takes away from your nails.

