
What Are Acrylic Nails — and Why Does Proper Removal Matter?
Acrylic nails are artificial nail enhancements created by combining a liquid monomer (typically ethyl methacrylate) with a polymer powder. When mixed together, these two components form a hard, durable coating that adheres directly to the natural nail plate or to a nail tip extension. The resulting material is far stronger than gel or press-on alternatives, which is why acrylic nails can last three to four weeks without chipping.
Because acrylic bonds at a polymer level to the nail surface, removal requires a chemical solvent — typically acetone — to break down those polymer chains and soften the material. This is why you cannot simply peel, snap, or clip acrylic nails off the way you might remove a press-on nail.
⚠ Why incorrect removal causes lasting damage
Peeling or forcing acrylic nails off rips away layers of the natural nail plate — a process called nail avulsion. The American Academy of Dermatology notes that this kind of physical trauma can permanently weaken the nail, cause thinning, introduce bacterial or fungal infection into the nail bed, and result in months of slow, painful regrowth.
Understanding the chemistry of acrylic nails is not just academic — it directly explains every step in the removal process and why shortcuts are harmful. This guide teaches you to work with acetone chemistry, not against it.
Semantic Entity Map — Related Concepts Covered in This Guide
Acrylic nail structureNail plate anatomyAcetone solvencyPolymer dissolutionFoil wrap methodBowl soak methodNon-acetone removerCuticle oilNail bed recoveryNail strengthenerNatural nail healthSalon removal costBiotin supplementationDental floss method
What You Need Before You Start
Gathering your tools before you begin prevents mid-process interruptions that cause acetone to evaporate and extend your soak time unnecessarily. Here is everything you need for a complete at-home removal session:
100% pure acetone
Cotton balls (not pads)
Aluminum foil strips (10 pieces)
Nail file — 100/180 grit
Nail buffer block
Cuticle pusher (orangewood stick)
Petroleum jelly (Vaseline)
Cuticle oil or vitamin E oil
Nail clippers
Hand cream or moisturizer
⚠ One critical distinction: use 100% pure acetone, not nail polish remover
Standard nail polish remover contains only 30–50% acetone diluted with water, glycerin, and other conditioning agents. This concentration is too low to dissolve acrylic polymer effectively. Using it will double or triple your soak time and often leave semi-dissolved acrylic that you must then force off — exactly the outcome you are trying to avoid. Purchase 100% pure acetone from a beauty supply store or pharmacy.
Work in a well-ventilated area. Acetone fumes are flammable and can cause headaches with prolonged exposure. Open a window, avoid using near open flames, and keep the acetone container sealed when not in use.
Three Methods to Remove Acrylic Nails at Home
The right method depends on your sensitivity to chemicals, the tools you have available, and how much time you can set aside. Here is a concise overview of each approach before we detail them fully:
🧪
Acetone Foil-Wrap
Most effective. Cotton balls soaked in pure acetone, held in place by foil strips. Used in professional salons. Takes 20–30 minutes.Best for most people
🥣
Acetone Bowl Soak
Fingers soak directly in a bowl of acetone. Faster than foil but uses more product and dries skin more aggressively.Faster alternative
🌿
No-Acetone Methods
Warm oil soak, soapy water, non-acetone remover. Gentler on skin. Requires 40+ minutes and works best on loosening nails.Sensitive skin
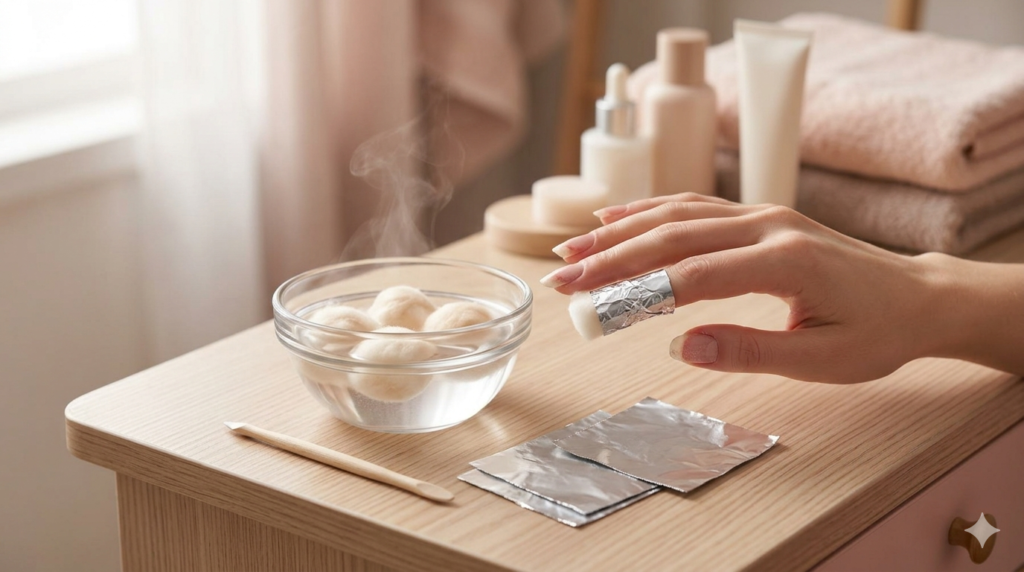
Step-by-Step Guide: Acetone Foil-Wrap Method
This is the same technique used by professional nail technicians. When done correctly, it removes acrylic cleanly without thinning, lifting, or traumatizing the nail plate underneath.
- 1Clip the excess lengthUse nail clippers to cut your acrylic nails as short as possible. Less material means faster dissolution — every millimeter you remove cuts soak time. Do not try to clip down to the natural nail; just reduce the bulk.💡 Pro tip: clip over a paper towel to catch clippings easily.
- 2File the topcoat and shiny surfaceUsing a 100-grit file, file the top surface of each acrylic nail until it looks dull and matte. This breaks the seal coat (topcoat or gel polish) that would otherwise block acetone from penetrating the acrylic layer. You are not filing the natural nail — stop once the shine is gone. This step alone cuts soak time by 5–10 minutes.
- 3Apply petroleum jelly around the cuticlesUse a cotton swab to coat the skin surrounding each nail — the cuticle area, sidewalls, and fingertip pad — with a thin layer of petroleum jelly. Acetone strips the skin’s natural oils, causing dryness, redness, and cracking. This barrier protects the skin without impeding acetone’s action on the nail itself.
- 4Soak cotton balls and place on nailsSaturate a cotton ball in pure acetone — it should be wet but not dripping. Press it flat against the filed nail surface, covering the entire nail plate. The cotton holds acetone in sustained contact with the acrylic rather than letting it run off or evaporate.
- 5Wrap each finger with aluminum foilCut foil strips approximately 4×4 inches. Fold a strip tightly around each fingertip, enclosing the cotton ball completely. The foil serves two purposes: it creates a sealed environment that prevents acetone evaporation, and the slight warmth it generates accelerates the dissolution process. Repeat for all 10 fingers.💡 Wrap all fingers before setting your timer — delays allow partial evaporation.
- 6Wait 20–30 minutes without peekingSet a timer and resist the urge to check every few minutes. Each time you unwrap a finger, you break the sealed environment and acetone evaporates from that nail. Short nails that were well-filed may be ready in 15–20 minutes; thick or long acrylic sets may need a full 30 minutes. Use this time to watch something — you genuinely cannot rush chemistry.
- 7Test one nail and push off softened acrylicUnwrap a single finger. The acrylic should appear whitish, soft, and slightly lifted at the edges. Using an orangewood stick or metal cuticle pusher, gently slide the tool from the cuticle toward the tip. The softened acrylic should move without resistance — if it does not, rewrap and soak for an additional 5–10 minutes. Never use force. Resistance means more soaking is needed.
- 8Buff away remaining residueOnce all acrylic is removed, a thin haze or texture may remain on the natural nail. Use a fine nail buffer (180–220 grit) to smooth the surface gently. Avoid over-buffing — two to three light passes are sufficient. Excessive buffing thins the nail plate.
- 9Moisturize thoroughlyAcetone removes all oils from the nail plate and surrounding skin. Immediately after buffing, massage cuticle oil into each nail bed and the surrounding skin, then apply a generous amount of hand cream. Repeat this moisture replenishment every few hours for the rest of the day.💡 The NHS recommends daily moisturizer application to nails and fingertips during recovery.
How to Remove Acrylic Nails Without Acetone
If you have a skin sensitivity to acetone, are unable to source it, or are working with nails that have already started lifting naturally, the following alternatives are viable — though they require significantly more patience.
| Method | Time Required | Effectiveness | Best For |
|---|---|---|---|
| Warm oil soak | 30–40 min | Moderate | Partially lifted nails |
| Warm soapy water | 40+ min | Low–moderate | Nails already loosening |
| Non-acetone remover | 30–45 min | Moderate | Sensitive skin |
| Dental floss technique | 5–10 min | Works only if nails are very loose | Heavily lifted nails only |
Warm oil soak method
Fill a bowl with warm (not hot) water. Add two tablespoons of olive oil and two tablespoons of dish soap. Soak your fingertips for 30–40 minutes. The warm oil penetrates the bond between the acrylic and the nail plate, allowing you to gently coax the edges with a cuticle pusher. This works best when the acrylic has already begun to lift at the edges. If you experience resistance, continue soaking rather than applying force.
Dental floss technique
This method is often circulated on social media but carries real risk of nail damage if misapplied. It works only when the acrylic nail is significantly lifted — loosely hanging — from the natural nail. Slide a length of waxed dental floss under the base of the lifted acrylic and use a gentle back-and-forth sawing motion toward the tip. If you meet resistance at any point, stop immediately. Forcing the floss can peel the natural nail along with the acrylic.
⚠ What truly does not work
Water alone cannot break down the acrylic polymer chains regardless of soak time — the chemistry simply does not allow it. Spending 90 minutes soaking nails in plain warm water will soften the surrounding skin without meaningfully dissolving the acrylic. Acetone-free alternatives require patience, but plain water is not among the effective options.
Common Mistakes to Avoid During Acrylic Nail Removal
Most nail damage from acrylic removal is not caused by acetone — it is caused by impatience and incorrect technique. These are the mistakes that lead to peeling, thinning, and long recovery times:
Peeling or picking at the acrylic
This is the single most damaging action in acrylic nail care. When you peel, you are not just removing the acrylic — you are pulling layers of the keratinized nail plate along with it. The result is a thin, fragile nail that may take six months or longer to fully recover. If the acrylic is not budging from gentle pushing, the solution is always more soaking time, never more force.
Using diluted acetone or nail polish remover
As noted above, standard nail polish remover contains insufficient acetone concentration to dissolve acrylic efficiently. Using it leads to partial softening, which tempts you to force the rest off mechanically — combining the worst of both failure modes.
Skipping the filing step
Filing off the topcoat is not optional. The topcoat creates a sealed, acetone-resistant layer. Trying to soak through it significantly extends your removal time and often results in uneven dissolution where some areas are soft and others are still firmly bonded.
Checking nails too frequently
Every time you unwrap a nail to check progress, acetone evaporates and the soaking process resets partially. Set your timer, leave all ten fingers wrapped, and check only when the timer goes off.
Skipping aftercare moisture
Acetone is not inherently destructive to the nail — but failing to replace the oils it removes is. Dry, oil-depleted nails become brittle and prone to splitting within hours. Immediate and consistent moisturizing after removal is as important as the removal process itself.
Nail Aftercare and Recovery After Acrylic Removal
Your natural nails will likely feel thin, dry, and sensitive immediately after acrylic removal — this is normal. With consistent aftercare, most people see a significant improvement in nail strength and texture within two to four weeks. Full nail plate renewal takes approximately six months.
Apply cuticle oil daily
Jojoba, vitamin E, or argan oil replenishes nail plate lipids that acetone strips away. Apply once in the morning and once before bed.
Use a nail strengthener
A keratin-based nail hardener applied twice weekly creates a protective layer while the natural nail regains its structure. Look for formulations without formaldehyde.
Let nails breathe
Avoid applying nail polish or a new acrylic set for at least one to two weeks after removal. Give the nail plate time to normalize before introducing new product chemistry.
Wear gloves for chores
Prolonged water exposure, cleaning chemicals, and dish soap further weaken recovering nails. Nitrile gloves during cleaning tasks are one of the most effective protective measures.
Support from the inside
Biotin (vitamin B7), collagen peptides, and protein-rich foods support nail growth and keratin production. Consult a healthcare provider before starting supplements.
Take regular breaks between sets
Dermatologists recommend a one to two week break between acrylic applications every three months. Continuous application without breaks compounds nail thinning over time.
When to see a dermatologist or nail technician
If you notice redness, swelling, warmth, discharge, or pain around the nail bed after removal, these may indicate a bacterial or fungal infection. Do not attempt to self-treat with over-the-counter products before getting a professional assessment. Nail infections can become serious if left untreated.
Salon vs. Home Removal — Which Should You Choose?
Both approaches use the same core chemistry — acetone soak followed by a cuticle pusher. The technical process is identical. What differs is the tools, expertise, and cost.
| Factor | Home Removal | Salon Removal |
|---|---|---|
| Cost | Under $5 in supplies | $15–$30 per session |
| Time | 30–45 minutes total | 20–30 minutes |
| Equipment | Manual filing only | Electric drill for faster filing |
| Risk if done wrong | Nail damage from impatience | Drill injury if tech is rushed |
| Convenience | At home, any time | Appointment required |
Home removal makes excellent financial sense for regular acrylic wearers — the savings accumulate quickly. However, a professional salon visit is worth considering in specific situations: if your nails feel particularly weak or damaged, if the acrylic is unusually thick or stubborn, if you notice signs of infection, or if this is your first time removing acrylics and you are nervous about the process. In these cases, the experience and expertise of a trained nail technician is valuable.
Frequently Asked Questions
How long does it take to remove acrylic nails at home?
The complete process takes 30–45 minutes from start to finish, including preparation and aftercare. The acetone soak itself typically requires 20–30 minutes. Thicker acrylic sets or nails with gel polish topcoats may take slightly longer.
Will removing acrylic nails damage my natural nails?
When done correctly using the acetone soak method, removal causes minimal damage to the natural nail. The primary cause of nail damage is mechanical force — peeling, prying, or picking — rather than the acetone itself. If you follow each step and allow adequate soak time, your natural nails should remain intact.
Can I soak my nails in acetone without foil?
Yes. The bowl soak method — where you submerge your fingertips directly in a bowl of pure acetone — works effectively. It is faster than the foil method but uses more acetone and is harsher on the surrounding skin. The foil method is generally recommended for first-timers because it keeps the acetone concentrated on the nail rather than soaking the entire fingertip.
How do I remove acrylic nails without acetone?
The most effective acetone-free approaches are a warm oil soak (olive or coconut oil with warm water, 30–40 minutes), a non-acetone nail polish remover soak, or the dental floss method for nails that have already lifted significantly. These methods require more patience but are gentler on skin and nails.
How often should I moisturize my nails after acrylic removal?
Apply cuticle oil at least once daily — morning and evening is ideal — for the first two to four weeks after removal. Apply hand cream after every time you wash your hands during the recovery period. Consistent moisturizing is what determines how quickly your nail plate returns to full strength.
Can I put on a new set of acrylics immediately after removing the old ones?
Technically possible but not recommended. The nail plate needs at least one to two weeks to rehydrate and regain structural integrity after removal. Applying a new set immediately prolongs the period of thinning and makes the eventual recovery longer. Dermatologists advise a complete break from acrylic enhancements every three months.
Is it safe to remove acrylic nails during pregnancy?
Acetone is considered low-risk in the quantities used for nail removal, but the fumes can cause nausea in a well-ventilated space. Pregnant individuals should perform acrylic removal in a fully ventilated area, limit exposure time, and consider asking their healthcare provider for specific guidance. The no-acetone methods are a lower-fume alternative during pregnancy.

